Arduino code on the Huzzah32
We can build circuits all day long, using sensors like the potentiometer to control outputs like the brightness of an LED, but changing the functionality of the circuit often takes a lot of redesign and building. Instead, we can use code on a microcontroller, wired to simple circuits, to accomplish our objectives, and make it easy to change the functionality on the fly and prototype rapidly.
Installations
To program the Huzzah32, download and install version 1.8.15 of the Arduino IDE. Then, install the ESP32 addon in Tools->Board->Board Manager by searching for ESP32. (Full instructions).
Now that the software is installed, select the Adafruit ESP32 Feather from Tools->Board->ESP32 Arduino->Adafruit ESP32 Feather. (The default selection is Arduino Uno, if you leave this selection then the code will not be able to upload to the board).
Next, plug the Huzzah32 into your computer using the USB cable. To communicate with the board, you need to select the name of the communication port associated with this board in Tools->Port (look at Tools->Port with the board plugged in and not plugged in and select the name of the port that disappears when the board is not plugged in). You may need to install a driver from Silabs.
Open and run Blink
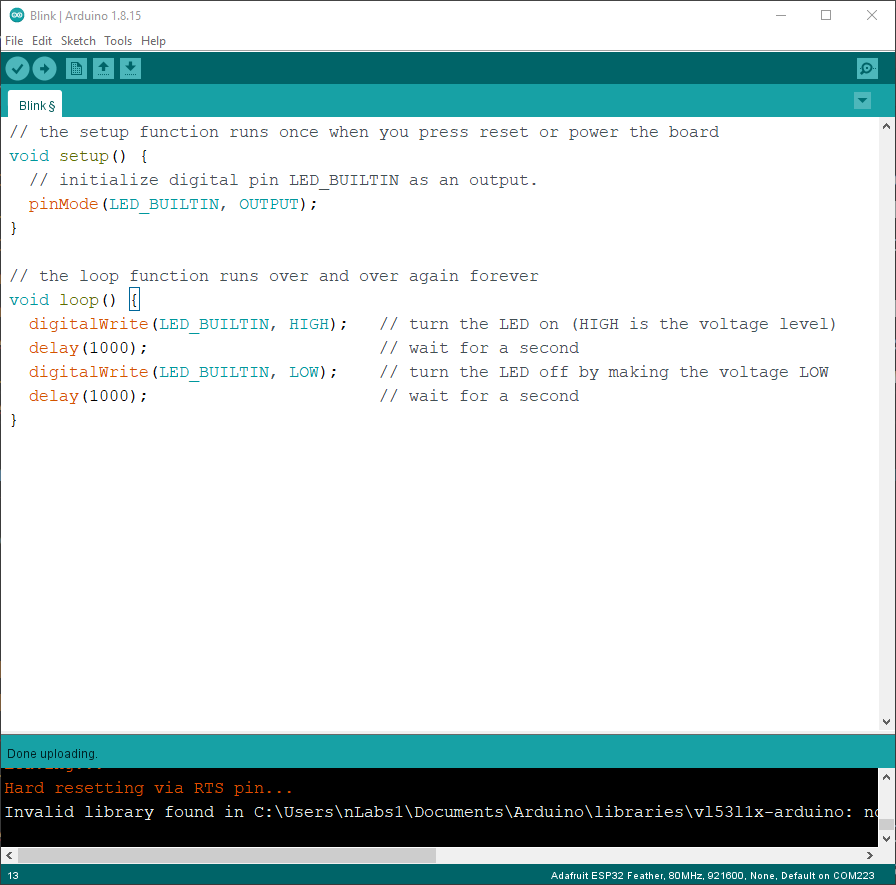
With the Arduino IDE open, the Adafruit ESP32 Feather board and port selected, go to File->Examples->0.1Basics->Blink. This sample code will blink an LED that is pre-soldered onto the Huzzah32. Press the Compile and Upload button (looks like a rightward facing arrow), and the Arduino will compile the code and load it onto the Huzzah32. When the code is loaded, a small red LED to the right of the USB port on the Huzzah32 should blink. (Note the first time you compile a sketch it will be agonizingly slow, because every file is being built from scratch. After the first time only code that changes will be compiled, so the process will be much faster).
 The Arduino IDE
Change Blink to be a different speed
Arduino code can be broken up into three sections:
- definitions
- setup()
- loop()
The definitions area is where you define variables, functions, and include libraries. setup() is a function that runs first, and is used to initialize variables and functions. loop() runs after setup(), and iterates over and over as long as the Huzzah32 has power. Let’s examine Blink.ino. The definition area contains comments, which are non-code text you can add to remind yourself what a variable or function is meant to do, and a variable called led that stores the number of the pin that is soldered to the orange LED. setup() initializes pin 13 to be an OUTPUT, which means that it can output 3.3V (HIGH) or 0V (LOW). By default, all pins are INPUT, which means they can read their voltage to know if they are HIGH or LOW, so if you want to use a pin as OUTPUT, you need to change it in setup(). loop() sets the voltage of pin 13 to HIGH, then waits 1000ms, then sets the voltage to LOW, then waits 1000ms. This makes the LED blink every 2 seconds.
Edit the code so that the LED blinks 10 times per second. How long should each delay be? Upload the code and verify that you can change the blinking rate. If you continue to increase the blinking rate, at what rate can you no longer tell that the LED is blinking, it just looks like it is always on?
Buttons and LEDs
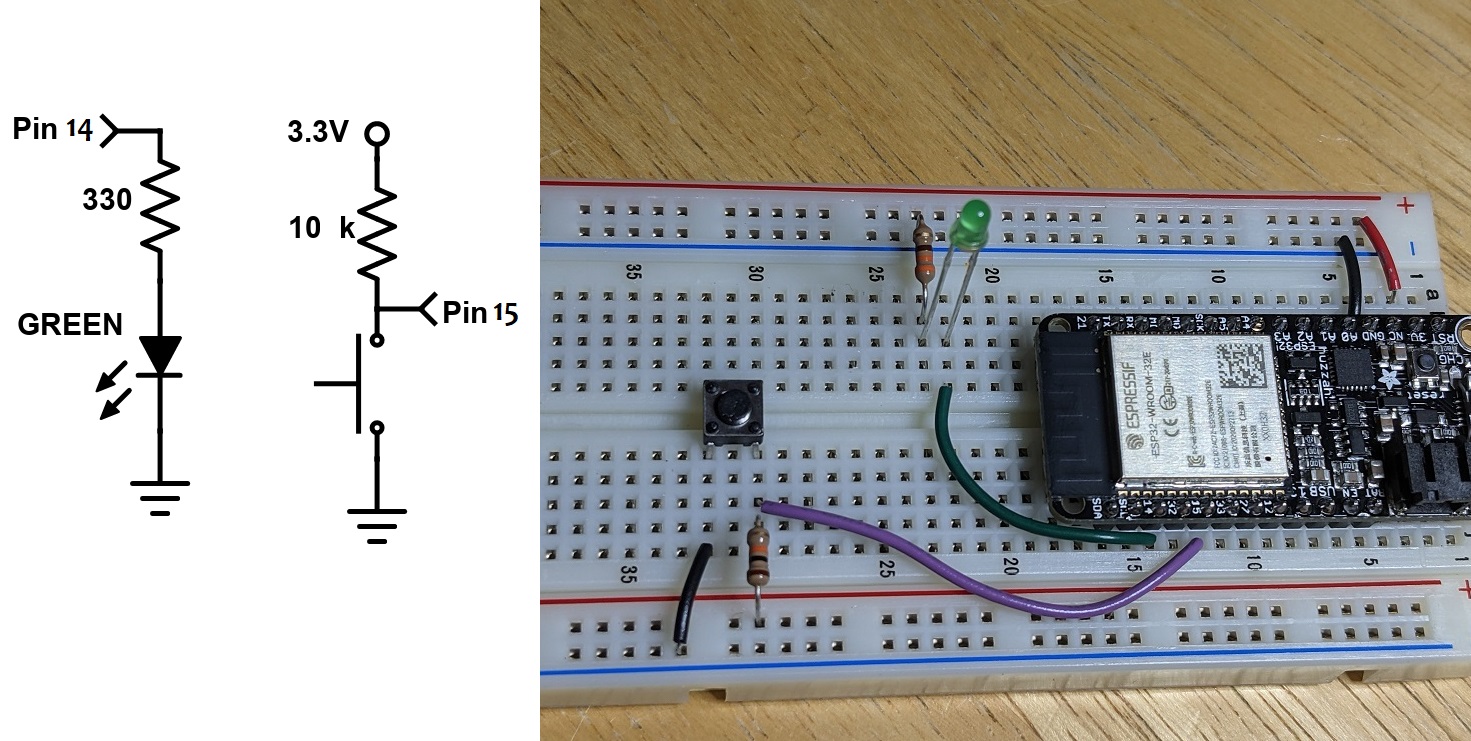
Make a new file, copy in the contents of Blink, and save the file. Edit the code so that the Huzzah32 can read a button and control an LED. When the button is pressed, the LED should be on, and when the button is not pressed, the LED should be off. Here is the circuit diagram for the LED and button, using pins 3 and 4.
 The Huzzah32 button and LED circuit diagram
Note that the button circuit is a little weird. What voltage does the Huzzah32 read when the button is pressed? When the button is not pressed?
Build an LED circuit, turn on when button is pressed
In the definitions part of your code, write a comment to remind yourself what this code will do. In setup(), set pin 3 to OUTPUT and pin 4 to INPUT. In loop(), use an if() statement with digitalRead() and digitalWrite() to control the LED based on the button.
Looking for help with the syntax? The Arduino reference page has help on every function and control structure: https://www.arduino.cc/reference/en/
Example: how to use if(): https://www.arduino.cc/reference/en/language/structure/control-structure/if/
Toggle the LED
Make another new file and copy in the previous code. Edit it to make the LED toggle every time the button is pressed (so if the LED is ON and the button is pressed, the LED should turn OFF and stay OFF until the button is released and pressed again). There are many ways to do this, but one way is to use a variable to remember if the LED is supposed to be on or off, and change the variable each time the button is pressed and released. You also need to know when the button was pressed, not just if the button is pressed, so you’ll need another variable to remember what the previous state of the button was.
Define the two variables in the definition area of the code. Call one int led_state = 0, and the other int but_prev = 1. In loop(), make a variable to save the current state of the button, int but_state = digitalRead(). In an if() statement if the but_state is LOW and but_prev is HIGH, change led_state to 1 if it is 0 or change led_state to 0 if it is 1. In a separate if() statement, turn the LED on if led_state is 1 or off if led_state is 0.
This method of writing code, checking the state of sensors one at a time, is called polling. The more states you have, the slower the overall performance of the code, because all of the states need to be checked. The Huzzah32 runs at 240MHz, so in general, you don’t have to worry about missing events. In fact, putting a small delay at the end of loop() might make things more reliable.
Use an interrupt to turn on the LED
Sometimes you can take advantage of a microcontroller ability called Interrupts. Interrupts are functions that are automatically called when an event occurs, and you don’t have to use polling style code to detect the event. Once you set up the interrupt, the function happens automatically! The pins on the Huzzah32 can be told to generate an interrupt on a FALLING edge using attachInterrupt() in setup(). Then write a function like void but_pressed() and it will automatically be called when the voltage on the pin goes from HIGH to LOW. Make a new file and recreate the toggle capability using an interrupt.